

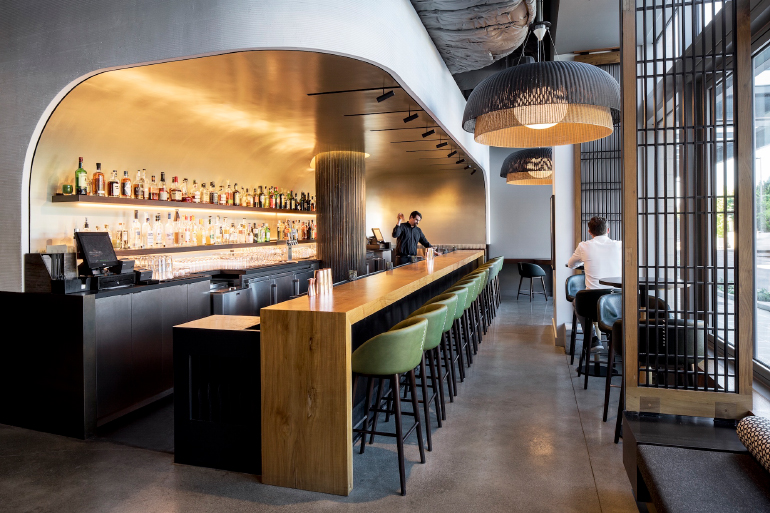
In the high-stakes world of hospitality, a bar is far more than an aesthetic centerpiece or a gathering spot for patrons. It is a complex, high-volume production line where every second saved translates directly to increased profitability and elevated guest satisfaction. When a bar experiences long ticket times, chaotic movement, or bottlenecked service, the root cause is rarely a lack of staff effort. Instead, it is almost always a failure of spatial architecture.
Designing a bar layout for maximum efficiency requires looking at the physical space through the lens of industrial engineering. Every piece of equipment, from the ice well to the speed rail, must be positioned to minimize unnecessary physical steps, bending, and reaching. By optimizing the ergonomics of the workspace, you allow bartenders to maintain focus on crafting premium drinks and building rapport with guests, rather than fighting their physical environment.
Whether you are building a high-volume nightclub, an intimate craft cocktail lounge, or a sprawling restaurant bar, utilizing smart design principles will streamline your operations and maximize your nightly revenue.
1. The Core Principle of the Bartender Cockpit
The foundation of an efficient bar layout relies on a design philosophy known as the bartender cockpit. This concept dictates that a bartender should be able to prepare eighty to ninety percent of your menu items without taking more than a single step in any direction. Every movement required to build a drink—reaching for a glass, scooping ice, grabbing a bottle, and pouring a mixer—should occur within a comfortable, natural turning radius.
The center of this cockpit is the ice well. Since ice is an essential component in nearly every cocktail, the ice well serves as the physical anchor point for the entire station. Directly in front of the ice well sits the speed rail, holding the highest-volume house liquors. Surrounding the well, within immediate arm’s reach, should be your fresh juices, syrups, bitters, garnishes, and essential mixing tools like shakers, strainers, and jiggers.
When you configure a bar using independent cockpits, you create self-sufficient workstations. This setup ensures that multiple bartenders can work side-by-side during a busy shift without crossing paths, bumping into one another, or competing for the same ingredients.
2. Optimizing Underbar Ergonomics and Equipment Placement
The space beneath and directly behind the bar countertop is where the mechanical heavy lifting occurs. Proper underbar configuration prevents physical strain and speeds up the production loop.
-
Glassware Accessibility: Clean glasses must be immediately available to the bartender without requiring them to walk to a distant storage rack. Incorporating underbar glass storage racks directly adjacent to the ice well, or utilizing overhead hanging racks, keeps the appropriate vessels at eye or waist level.
-
The Speed Rail Hierarchy: A standard single or double speed rail should be attached directly to the front of the ice well at hip height. This positioning allows bartenders to grab bottles using muscle memory without looking down. The rail should be organized uniformly across all stations, moving from light spirits to dark spirits, so that any bartender can step into any station and work instantly.
-
Integrated Sink Modules: Every cocktail station needs an immediate cleaning solution. Installing a dump sink equipped with a high-pressure glass rinser right next to the ice well allows bartenders to quickly rinse shaker tins and mixing glasses between builds, eliminating the need to walk away to a centralized dish station.
3. Designing Distinct Flow Zones for Guest and Service Staff
A common layout mistake that kills bar speed is failing to separate the paths of your guests, your bartenders, and your floor service staff. When cocktail servers must push through a crowd of standing patrons to grab drinks for their tables, the entire service system breaks down.
To prevent this friction, divide your physical bar counter into three distinct zones:
The Patron Zone
This area spans the main length of the bar top where seated or standing guests order and consume drinks. It should feature comfortable barstools, adequate footrests, and clear access to bartenders. Keep this zone free of service clutter, POS terminals, and dirty glassware bins to maintain a welcoming atmosphere.
The Service Bar Zone
This is a dedicated section of the bar counter specifically reserved for fulfillment of table orders brought in by floor servers. The service bar should be located at the far end of the bar layout, away from the main entrance and guest seating. It should feature its own dedicated POS printer, a speed rail containing the spirits most frequently ordered in the dining room, and an independent glassware supply. This separation allows the service bartender to rapidly churn out restaurant orders without competing with walk-up bar patrons.
The Breakdown and Dish Zone
Dirty glassware, empty bottles, and used linen must flow away from the active service zones without interrupting production. Position your commercial glass washer, three-compartment sink, and trash receptacles away from the center of the bar. Ideally, this breakdown zone should be accessible from behind the bar, allowing support staff to restock clean items without entering the bartender’s primary cockpit workspace.
4. The Critical Role of Backbar Design and Storage Visibility
The backbar serves two equally important functions: it acts as a visual merchandising display for your premium spirits and provides crucial storage space for secondary, low-volume inventory.
An efficient backbar design places premium, high-profit bottles at eye level for the consumer, encouraging impulse purchases and upgrades to top-shelf liquor. However, from an operational perspective, the lower shelves of the backbar should hold back-up inventory for your speed rails, premium mixers, and specialized glassware.
Ensure the depth of the walkway between the front bar and the backbar is exactly between three and three and a half feet. If the walkway is too narrow, bartenders cannot pass behind one another without physical contact, increasing the risk of spills and accidents. If the walkway is wider than four feet, bartenders must take too many steps to reach bottles on the backbar, adding valuable seconds to every single transaction.
5. Integrating Technology and POS Placements
A bar can have the fastest cocktail production line in the world, but if the ordering and payment processing system is bottlenecked, service will stall. Point of Sale (POS) terminals must be strategically embedded into the layout to prevent staff from waiting in line to enter orders or close out tabs.
Plan for one POS terminal or handheld tablet station for every two bartenders. These terminals should be positioned at the boundaries between workstations, allowing both bartenders to access the screen with minimal steps. Furthermore, cash drawers and credit card terminals should be mounted below the bar top surface, keeping the transaction process discreet and preserving valuable counter space for drink presentation.
Frequently Asked Questions
What is the ideal counter height and width for a standard commercial bar layout?
A standard commercial bar feature two distinct levels. The front bar top, where guests sit and place their drinks, should be forty-two to forty-four inches high and twenty-four to thirty inches wide. The interior bartender work counter, where drinks are actually built, should sit lower, at thirty to thirty-four inches high and roughly sixteen to twenty inches wide. This tiered configuration creates a natural sightline separation, hiding underbar mechanical equipment from the guest’s view while providing an ergonomic working height for the staff.
How many independent bartender stations do I need based on my guest capacity?
As a general industry benchmark, you should plan for one fully equipped independent bartender station for every fifty to sixty seats in your establishment, or every twenty to twenty-five linear feet of bar counter. If your business model focuses heavily on complex craft cocktails, you may need to reduce that ratio to one station for every forty seats to account for the longer preparation times required for intricate beverage builds.
Where should the draft beer tower be located for maximum efficiency?
The draft beer tower should be positioned in a centralized location that is easily accessible to both the primary bartenders and the service bar area. Draft beer requires a direct line from the keg storage cooler, so placing the tower near the backbar or a central pillar often shortens the line run, reducing foam issues. Avoid placing the draft tower directly in front of an individual cocktail station, as the continuous pouring of beer will disrupt that bartender’s localized cocktail cockpit work loop.
How do I handle trash and recycling placement without creating odors or slowing down staff?
Trash receptacles should be integrated directly into the underbar stainless steel modules via drop-chutes cut into the work surfaces. This allows bartenders to discard straws, citrus peels, and napkins in a single downward motion without opening cabinet doors. These bins must be lined with heavy-duty bags and emptied frequently into a centralized back-of-house disposal area during service lulls to prevent fruit flies and foul odors from reaching the guest zone.
What is the advantage of using a shared ice well versus individual wells for each bartender?
Individual ice wells are vastly superior to a single shared well. When two bartenders are forced to share a single ice well, a physical bottleneck is created during peak hours. Staff will constantly wait for one another to finish scooping, leading to collisions and decreased speed. Providing each bartender with their own dedicated, insulated ice well ensures complete operational independence and maximizes overall output.
Should liquor storage rooms be located directly behind the bar or in the back of the house?
Ideally, high-volume backup liquor and backup keg storage should be located immediately adjacent to or directly beneath the bar area to facilitate rapid restocking during a busy shift. If space constraints require your main liquor vault to be located in a distant back-of-house storeroom, you must implement a smaller shift cage closer to the bar. This intermediate cage should hold exactly enough inventory to get through a single busy night, preventing your bar support staff from embarking on long journeys away from the floor when a critical bottle runs out.